Job Creation from scratch
Overview
This guide provides step-by-step instructions for creating and managing job postings in the Job Management .
Getting Started
- Navigate to Job Management -> Create Job Post.
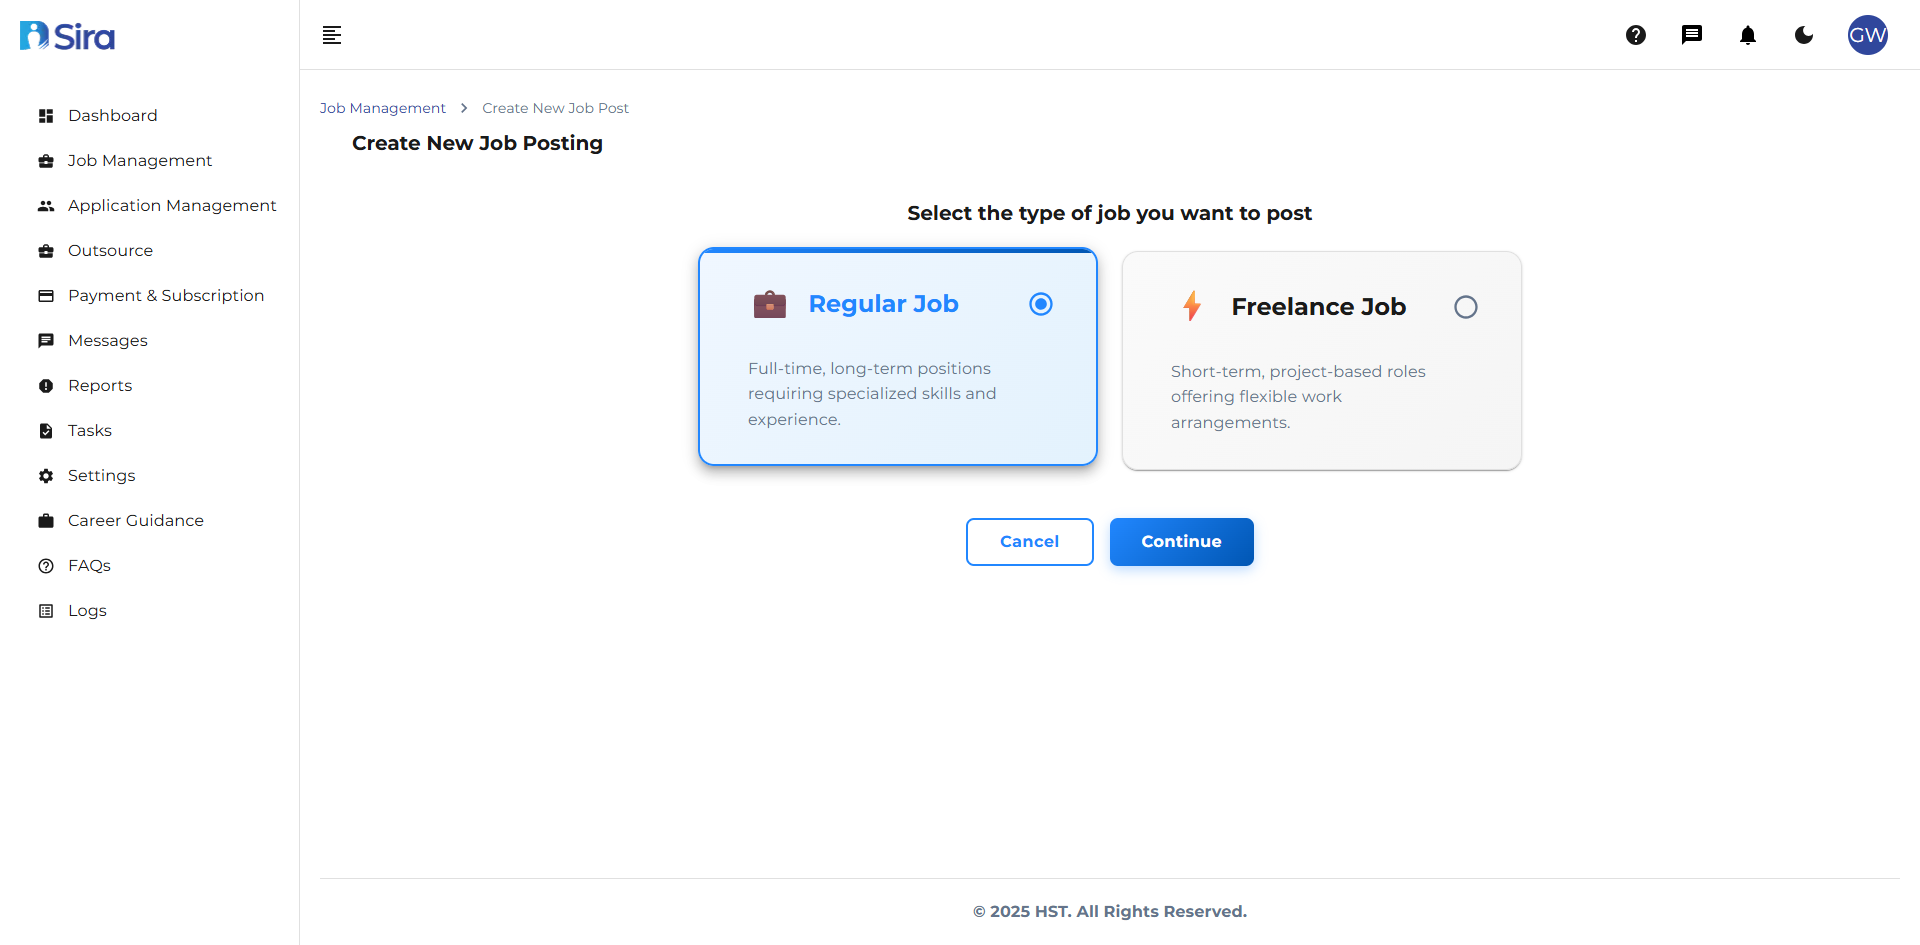 In this section, you can see an option for job type u want to post
When you begin creating a new job posting, first select the type of job:
Regular Job
- Full-time, long-term positions
- Requires specialized skills and experience
- Ideal for permanent roles
Freelance Job
- Short-term, project-based roles
- Flexible work arrangements
- Perfect for temporary or contract work
Actions:
- Cancel - Return to previous screen
- Continue - Proceed to next step
Creation Method
- Navigate to Job Management → after selecting job type then click continue.
 In this section, you can select either to post job using template or create from the scratch
Choose how you want to create your job posting:
Blank Job
- Start from scratch with empty fields
- Recommended for unique positions
Use a Template
- Choose from pre-designed templates
- Faster setup process
- Consistent formatting
Blank Job
Job Title
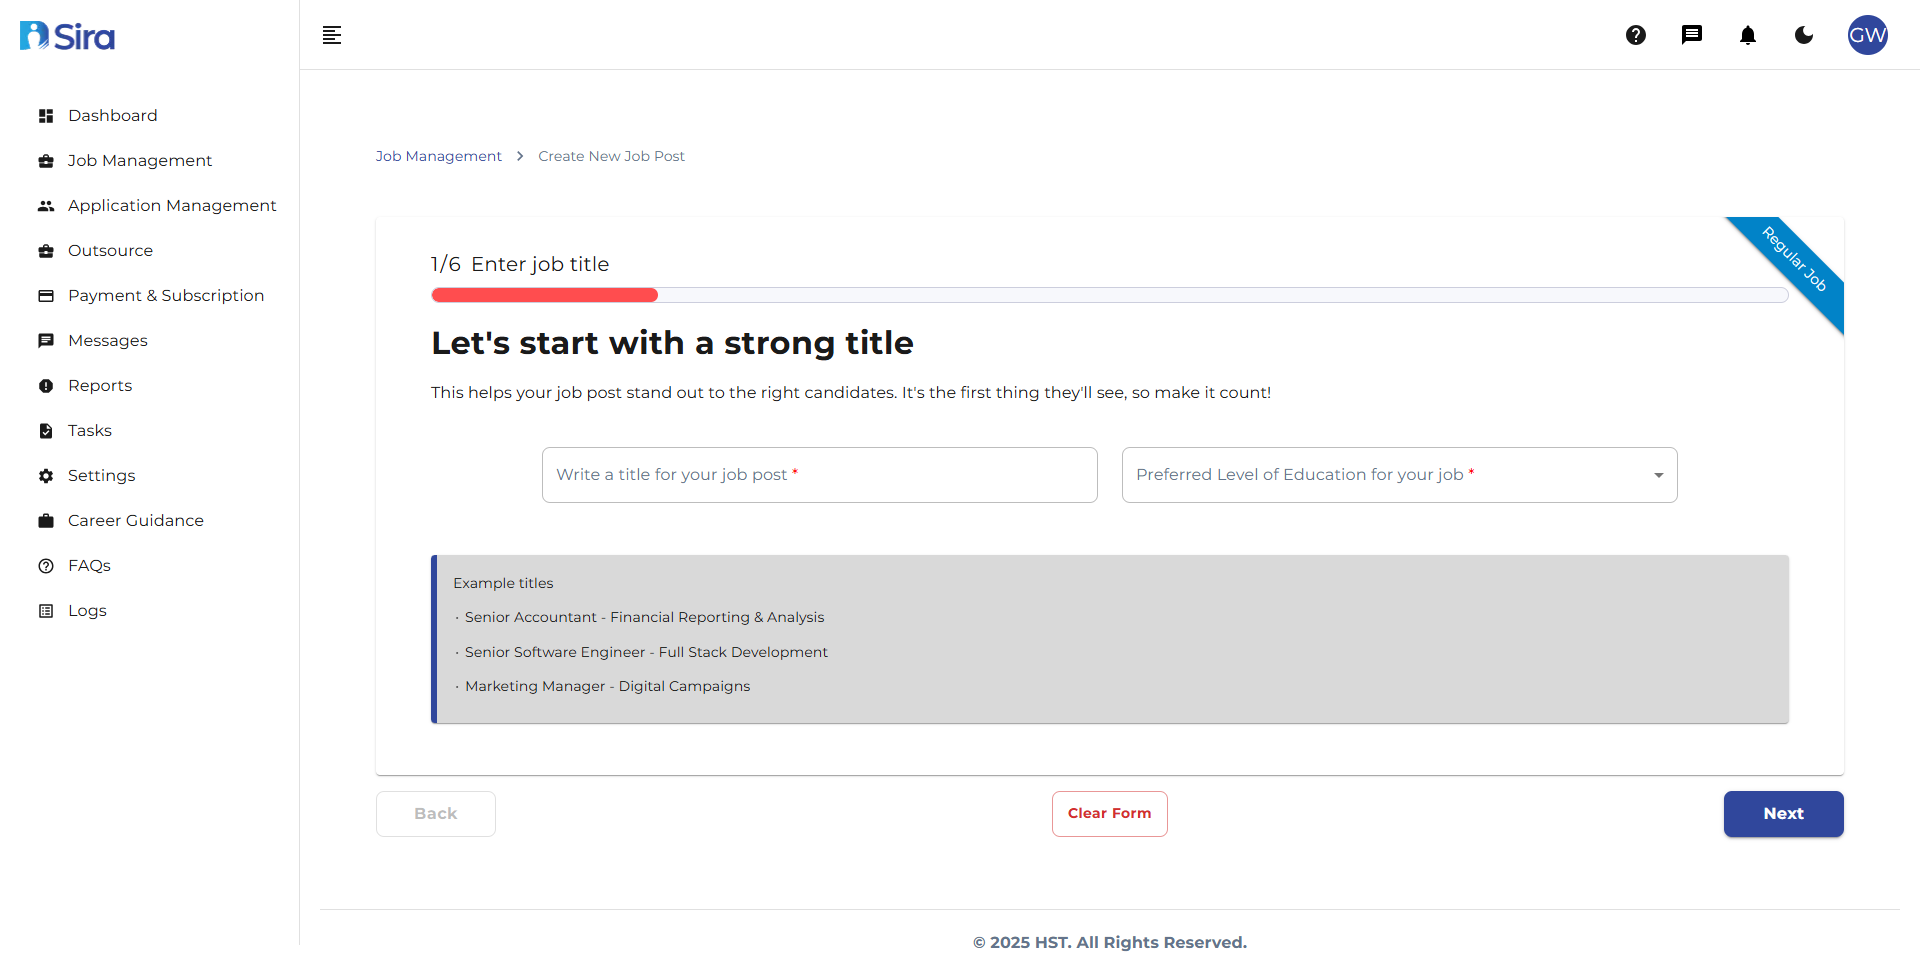 Step 1/6: Enter Job Title
Purpose: Create an attractive, searchable job title
Requirements:
- Write a title for your job post * (Required)
Best Practices:
- Use clear, specific titles candidates will search for
- Include key technologies or specialties
- Make it stand out while remaining professional
Example Titles:
- Senior Accountant - Financial Reporting & Analysis
- Senior Software Engineer - Full Stack Development
- Marketing Manager - Digital Campaigns
Navigation:
- Back - Return to previous step
- Clear Form - Reset all fields
- Next - Continue to job details
Job Details
 Step 2/6: Job Details
Purpose: Provide comprehensive position information
Required Information:
Role/Position Section:
- Job Category * (Required)
- Number of Opening * (Required)
Career Level:
- Select appropriate experience level
Job Location:
- Enter physical work location
- Address auto-completion available
- Map coordinates generated automatically
Job Description:
- Use rich text editor for formatting
- Include company overview and role specifics
- Describe team environment and culture
Duties & Responsibilities:
- List key responsibilities using bullet points
- Use clear, action-oriented language
- Include both daily tasks and long-term objectives
Tips:
- Use specific, measurable responsibilities
- Highlight unique aspects of the role
- Keep paragraphs concise and scannable
Qualification
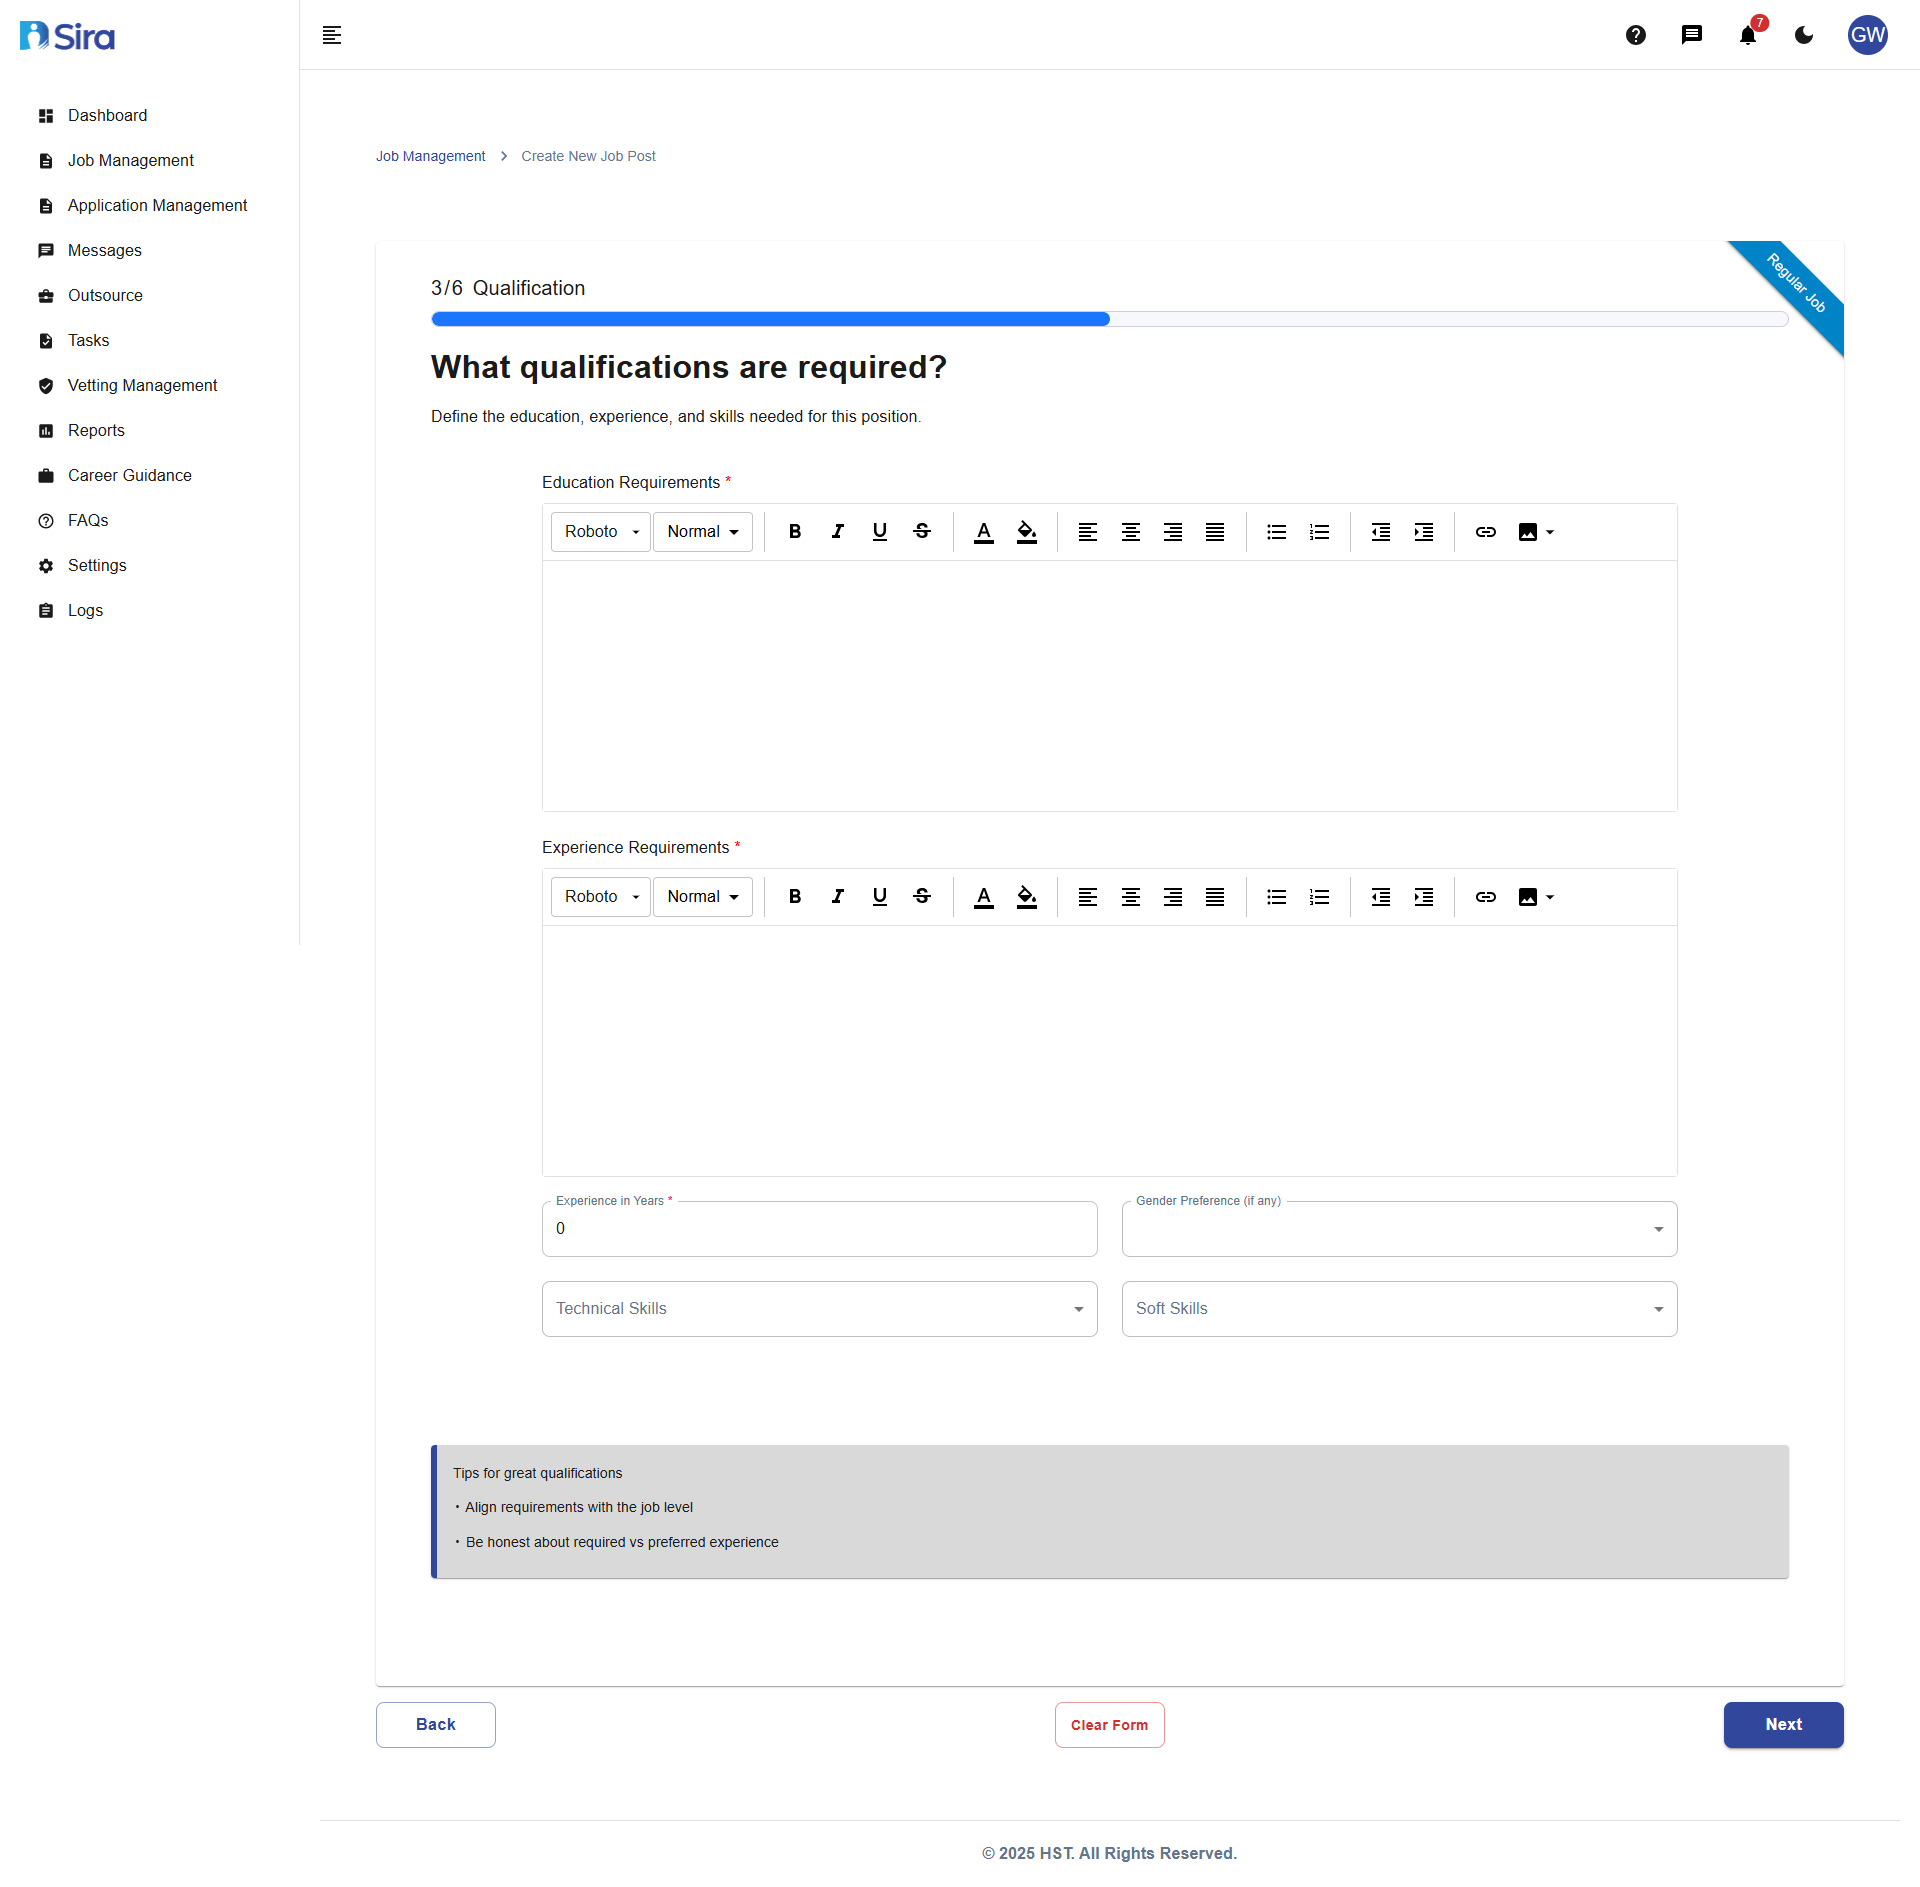 Step 3/6: Qualifications
Purpose: Define education, experience, and skill requirements
Required Sections:
Education Requirements:
- Specify minimum educational qualifications
- Include field of study if relevant
Experience Requirements:
- Describe necessary professional background
- Include industry-specific experience
Additional Requirements:
- Experience in Years - Set minimum experience (0+)
- Technical Skills - List required technical competencies
- Soft Skills - Include interpersonal and professional skills
- Gender Preference - Specify if any gender preference exists
Best Practices:
- Align requirements with job level
- Distinguish between required and preferred qualifications
- Be realistic about experience expectations
Compensation & Benefits
 Step 4/6: Compensation & Benefits
Purpose: Attract candidates with competitive packages
Required Information:
Salary Type:
- Select compensation structure type
Salary:
- Enter salary amount or range
- Specify currency if applicable
- Salary is depends on salary type
Benefits Offered:
- List all available benefits
- Use rich text editor for formatting
Transparency Tips:
- Include salary ranges when possible
- Mention performance bonuses or allowances
- Highlight non-monetary benefits
- Be clear about health insurance and work options
Timeline
 Step 5/6: Timeline
Purpose: Set hiring and start date expectations
Required Dates:
Job Post Start Date: *
- When the position becomes publicly visible
Job Post End Date: *
- When applications will no longer be accepted
Additional Information:
- Employment Type - Specify full-time, part-time, etc.
- Work Location - Define onsite, remote, or hybrid
Timeline Considerations:
- Allow 2-4 weeks for complete hiring process
- Consider candidate notice periods (typically 2 weeks)
- Set realistic start dates to avoid rushed decisions
Application Details
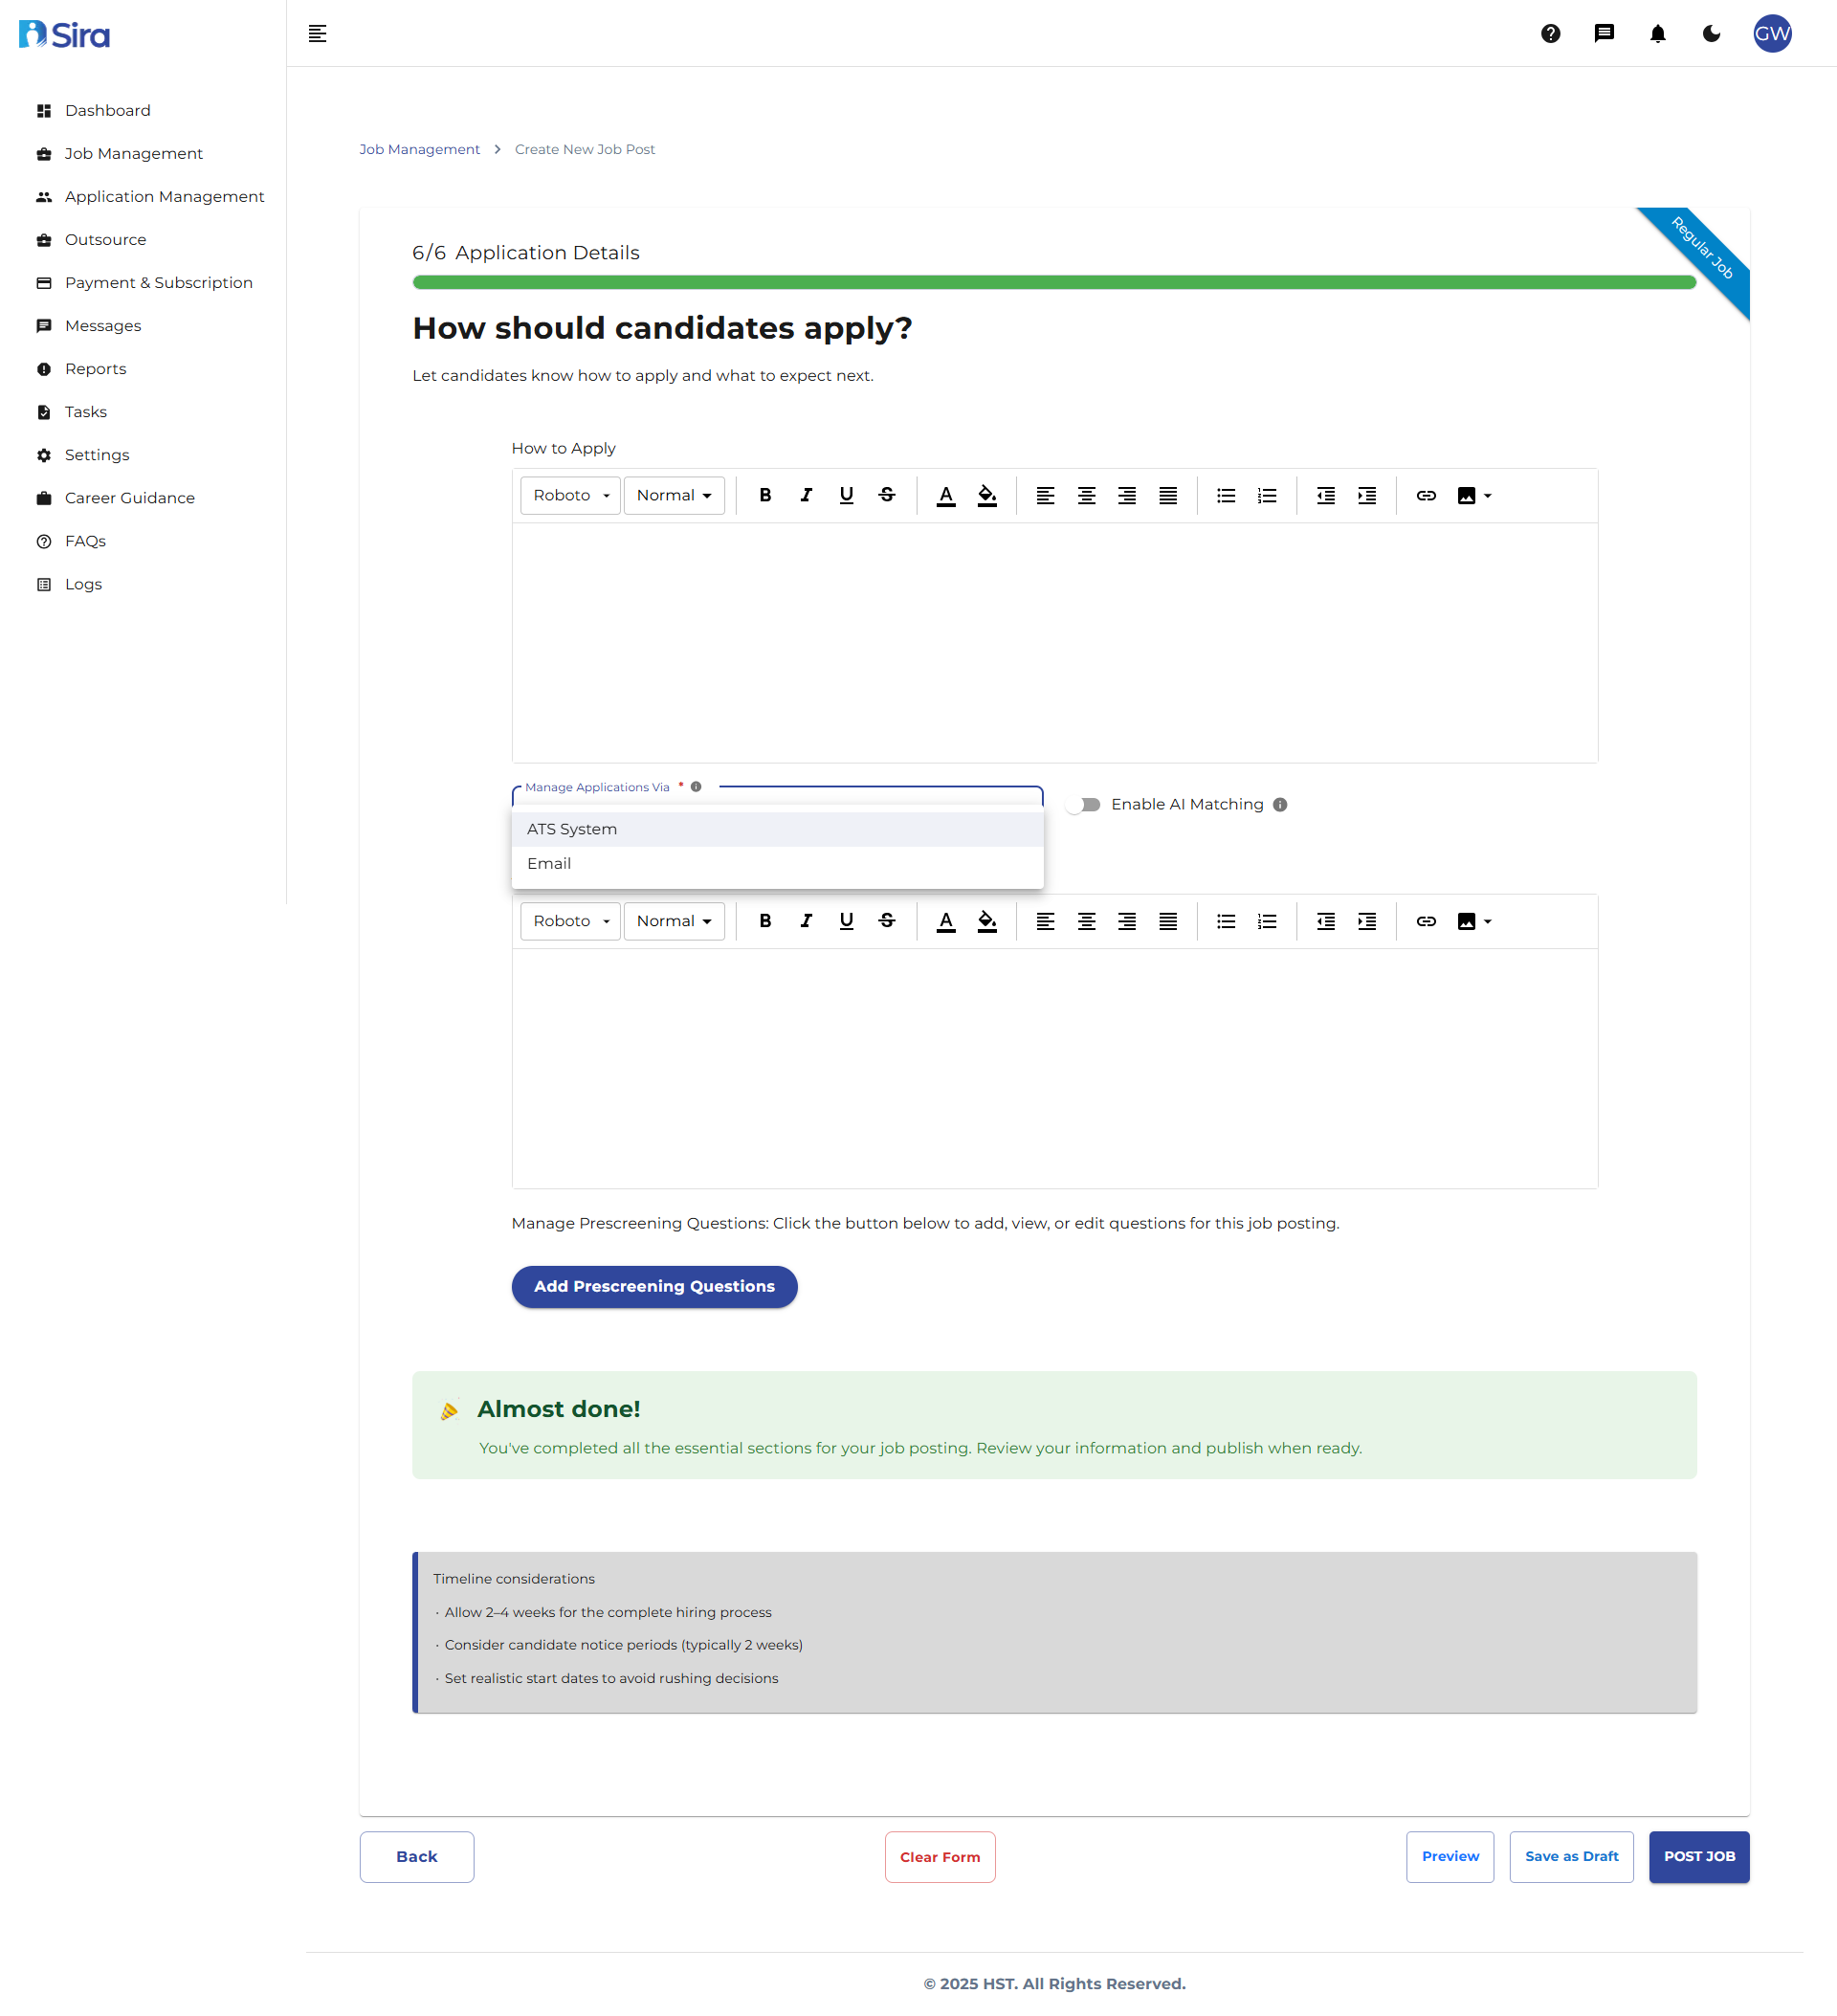
 Step 6/6: Application Details, Final Review & Publication
Purpose: Define application process and screening
Application Method:
- How to Apply - Detailed instructions for candidates
- Use rich text editor for clear formatting
Application Management:
- Manage Applications Via - Select ATS System or Email(for Non-ATS users)
- If Email selected Provide email
- Enable AI Matching - Use AI to match candidates
- If AI matching selected minimum passing score is required & near by radius is optional to add
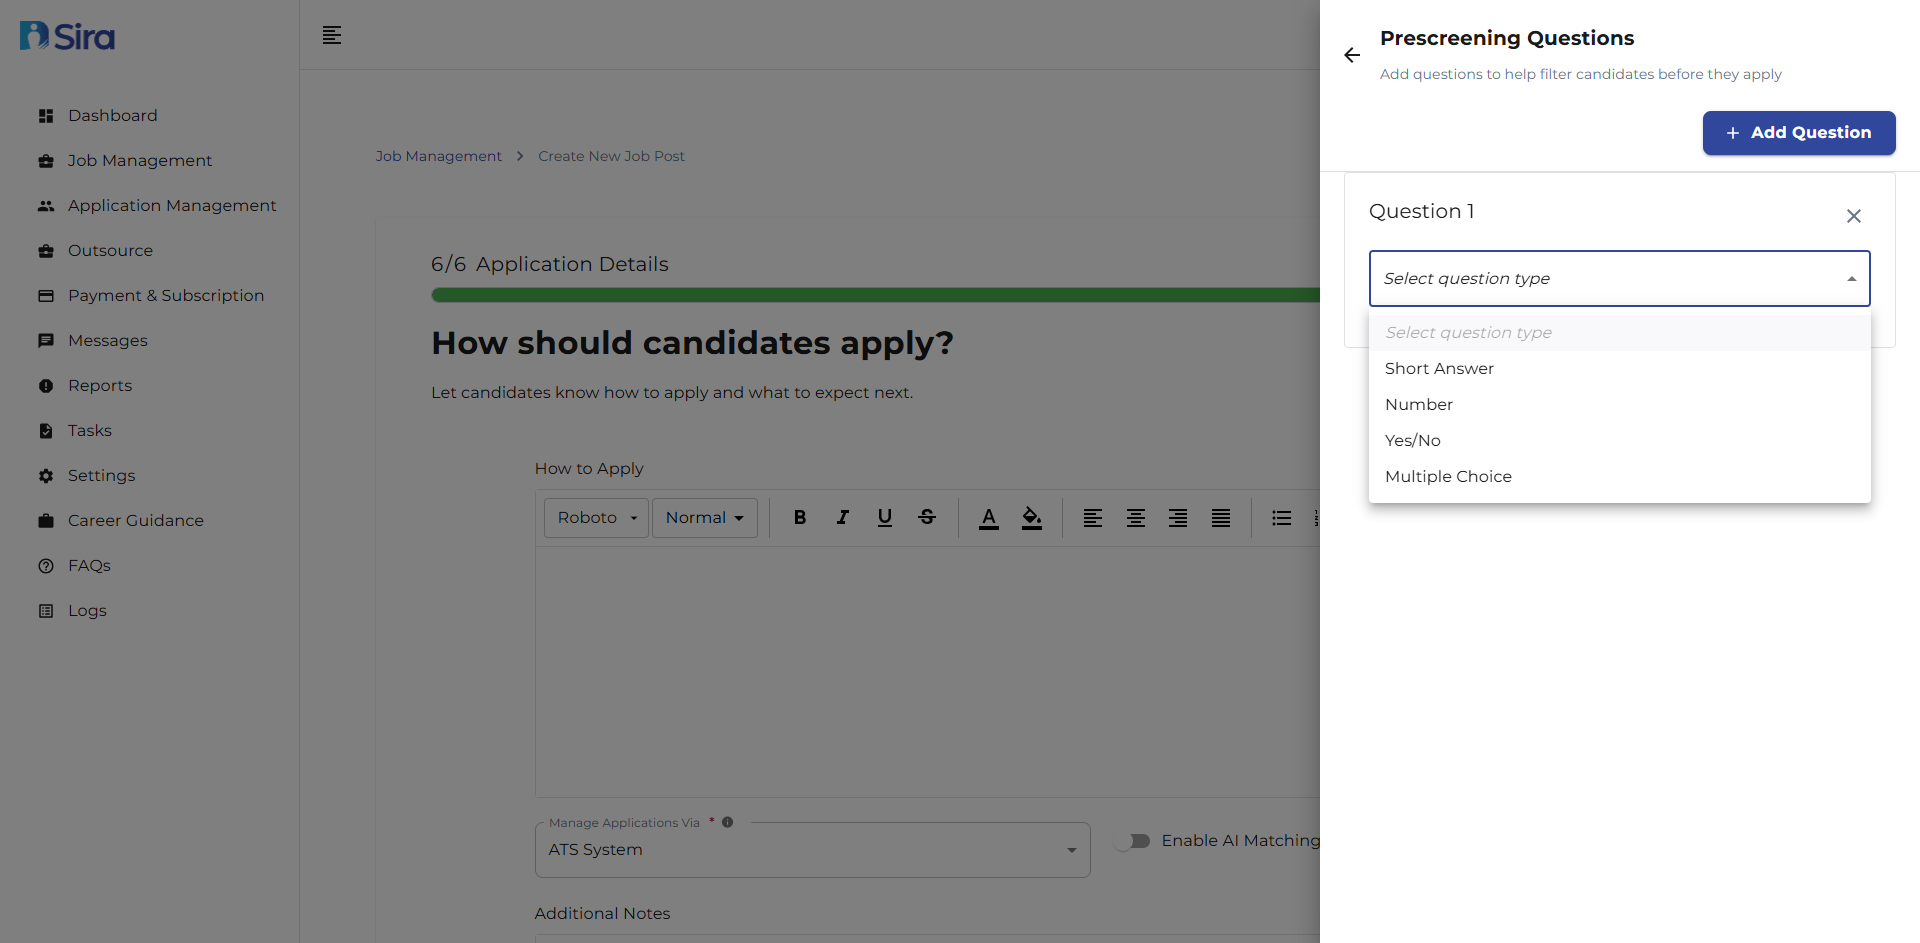
Prescreening Questions:
- Click "Add Prescreening Questions" to create custom questions
- View or edit existing questions as needed
Completion Options:
Preview
- Review the complete job posting before publishing
- Check all sections for accuracy and completeness
Save as Draft
- Save incomplete postings for later editing
- Perfect when waiting for additional information
POST JOB
- Publish the job posting to make it live
- Position becomes visible to candidates immediately
Final Considerations:
- Double-check all required fields are completed
- Verify dates and deadlines are correct
- Ensure contact information is accurate
- Review formatting and spelling
Navigation Tips
Throughout the Process:
- Use Back to return to previous steps
- Clear Form resets current section
- Progress indicator shows completion status (e.g., 1/6, 2/8)
- Help tips provided on each screen for guidance
Best Practices
- Be Specific - Use clear, detailed descriptions
- Be Transparent - Provide accurate compensation information
- Be Realistic - Set achievable requirements and timelines
- Be Thorough - Complete all sections for best results
- Be Professional - Maintain consistent, professional tone
Troubleshooting
Common Issues
Problem:
- Red validation errors on required fields
- Cannot proceed to next step
- Form not saving information
Solutions:
- Ensure all * (required) fields are completed
- Check for special characters in text fields
- Verify date formats (mm/dd/yyyy)
- Try using different input methods
Problem: Template Issues
- "SAVE Job" button not working
- Progress lost when navigating away
Solutions:
- Complete all 6 steps in the Job creation process
- Ensure all required fields (*) are filled
- Check for internet connectivity issues
Problem: Navigation Issues
- "BACK" or "NEXT" buttons not working
- Stuck on one step of job creation
- Progress tracker not updating
Solutions:
- Complete all required fields in current step
- Check for validation error messages
- Deep refresh your browser by pressing "Ctrl + Shift + R"
Problem: Job Won't Post or Update
- Error when clicking "POST JOB"
- Changes not saving when editing
- "Save as Draft" not working
Solutions:
- Verify all required fields are completed
- Check for special characters in job title
- Ensure deadline is in the future
- Try saving as draft first, then posting
Problem: Date Pickers Malfunctioning
- Cannot select dates from calendar
- Date format errors
- Start/End date validation issues
Solutions:
- Manually type dates in mm/dd/yyyy format
- Ensure end date is after start date
- Check system date format settings
Need Assistance?
- Contact customer support
- Refer to FAQs section for common questions
- Contact system admin for technical issues